



IPFS (InterPlanetary File System) is a peer-to-peer protocol and network designed to create a decentralised method of storing and sharing files.
Unlike the traditional client-server model of the internet, IPFS allows users to share files directly with each other, rather than relying on a centralised server to store and distribute content.
Files in IPFS are addressed using content-addressing, meaning each file is given a unique hash or CONTENT IDENTIFIER (CID) based on its content, and this hash is used to retrieve the file from the network.
IPFS stores content as blocks identified by CIDs. Adding a file stores it on your node; it does not automatically copy it to other nodes. Keep a reachable copy online, or arrange remote pinning, so other readers can retrieve it. See IPFS persistence.
Read: An Introduction to IPFS
For this example we are creating a simple website.
Step 1: If you are unfamiliar with web design write the main content for your website including Title, Main Body of text, with links to other pages/site & footers.
Step 2: Use a HTML template! Paste the text you have written accordingly. Optional to also create a .CSS stylesheet for your website.
Step 3: Put your homepage in index.html at the root of the site folder. Include its images and CSS, using relative paths such as style.css so they also work under an IPFS gateway URL.
IPFS Desktop manages the node for you. Keep it running while sharing your site.
For the command-line route, initialize a new repository once:
ipfs init
Then start the node and leave this terminal open:
ipfs daemon
Run the remaining commands in a second terminal. Do not start a second daemon if IPFS Desktop already manages this repository.
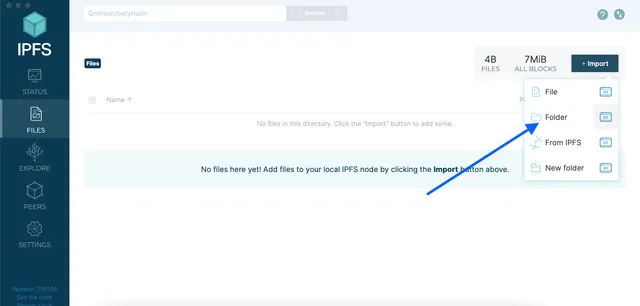
In IPFS Desktop, select the folder with your website files using the Add Folder option.
–
For the CLI route, run this from the parent directory of your site folder:
ipfs add -r folder_name
Replace folder_name with your folder name (quote names containing spaces). Save the CID on the final added ... folder_name line: it identifies the whole directory, not just index.html.
The CLI ipfs add command pins imported content locally by default. Check the folder pin with:
ipfs pin ls YOUR_FOLDER_CID
Replace YOUR_FOLDER_CID with the CID from the previous step; the output should say recursive. Pinning protects this node's copy from garbage collection, but does not keep a switched-off computer online. For availability while your node is offline, arrange remote pinning and confirm the remote service has finished pinning.
First check your site through the local gateway at http://127.0.0.1:8080/ipfs/YOUR_FOLDER_CID/ (use the gateway port printed by your daemon if different). The trailing slash lets relative links resolve inside the directory.
A public gateway such as https://ipfs.io/ipfs/YOUR_FOLDER_CID/ can serve it once it can retrieve the content from a reachable node. A successful local preview does not prove public availability.
In our case the CID = QmW2UEfap1vrRRvS5H9wed8qmsx4WsvXBk3GPGVVfWx3r3
Interplanetary Naming System (IPNS) allows you to update the IPFS CIDs associated with your website and still serve a static link. It is provided as a key.

In the settings menu for your site folder on IPFS desktop application select Publish to IPNS.
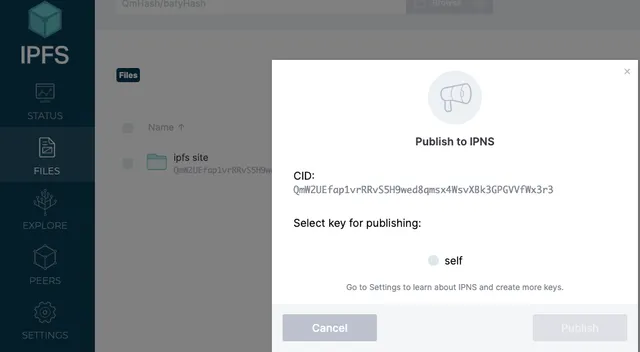
Key: “k51qzi5uqu5di670a6uxywo17b2be1eyhoa2cl0qlwpfxn5p9ypcu8jbzgnj4n”
It can also be used to view our site via a gateway: https://ipfs.io/ipns/k51qzi5uqu5di670a6uxywo17b2be1eyhoa2cl0qlwpfxn5p9ypcu8jbzgnj4n
The site has been created, now we need a way to point a URL to the content.
For example.com, add this DNS record, replacing YOUR_FOLDER_CID with your directory CID:
| Type | Name | Value |
|---|---|---|
| TXT | _dnslink.example.com | dnslink=/ipfs/YOUR_FOLDER_CID |
Some DNS providers append the zone automatically; enter just _dnslink there. If using the IPNS name above, the value can instead be dnslink=/ipns/YOUR_IPNS_NAME. See DNSLink.
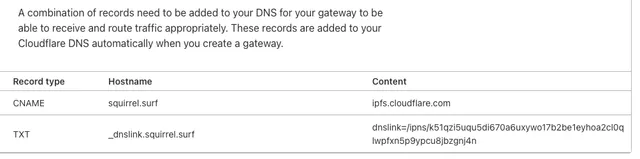
After DNS propagation, try https://ipfs.io/ipns/example.com/. Serving the site directly at https://example.com/ also needs a DNSLink-capable gateway and HTTPS configuration; the TXT record alone does not set those up. Follow the custom-domain guide.
Congratulations! You now have a censorship resistant website.
Resources